Sunday, 28 June 2015

Floor Insulation

Had a great day adding insulation to the floor.  I knew this part would be tricky, but I had a great bunch of worker bees helping me!   I want the whole exterior to be wrapped in 2 inches of EPS rigid foam insulation, and that includes the underside of the floor system. 

I'm using EPS becuase of it's breathability.  It is vapour permeable so it will not trap moisture inside the walls. I specifically chose TrueFoam Foundation Plus because it is made locally, and they have many initiatives for recycling styrofoam.


 Ann helped me carry the rigid insulation to the site.  The rigid was glued to the bottom of the frame (using construction adhesive that wouldn't melt the foam) then covered with a thin layer of plywood.

Hard to see, but Rob is underneath the frame, screwing the 3/8" pressure treated plywood to the bottom of the frame (through the 2" if rigid) to protect it from critters.


 Connie snapping chalk line to cut the final piece of plywood for under the floor.

Teamwork!  We all stood on/held the plywood while Rob cut it to the proper size.


The cavities were then filled with Roxul insulation.  I couldn't get the 7-1/2" (R32) to fill the floor cavity fully, so instead I lined the bottom of each with 2" rigid insulation, then used 5-1/2" Roxul (R-22) to fill it to the top.  In the end my floor will have an R-value of about R38, which is overkill!  But made sense with the 2x8 floor construction.


Connie and Kyle measuring the 2" rigid to fill each cavity.


The rigid was cut small, leaving an inch around the edge.  This gap was filled with spray foam to help air seal the cavity from any air infiltration from below.

  Once dry, we trimmed the overflow of foam insulation so the Roxul would fill the cavity nicely.


Roxul in place at this end.

Roxul was lovely to work with!  You have to be gentle because it crumbles if you grab too hard, but it cuts like butter with a bread knife and filled the cavities nicely.  I chose it because it's fireproof, resistant to rot, keeps its shape over time, and retains its R-value regardless of humidity or temperature variations. 


It's easy to leave a gap along the edges (where the Roxul meets the joists) when you are patting the Roxul into place, but these gaps can reduce the effectiveness of the insulation if any cold air is allowed to infiltrate this space.  So, before covering the Roxul with the vapour barrier, we went around the edges of each batt with a putty knife, gently raising the edges to the level of the joists, eliminating any gaps.


 More construction adhesive to hold the vapour barrier in place and help with air sealing.  The less air passing through the floor, the less chance for heat loss/gain or moisture problems. 


Laying out the vapour barrier.  I wish I had rubber gaskets to seal around the drain pipes, but Tuck Tape will have to do.
 Sticking the vapour barrier down in the adhesive.

My hope was to sheathe the floor with 3/4" plywood before heading home, but unfortunately I bought tongue & groove plywood, which is 47.5" wide instead of the full 48".  Since I framed the floor with 48" centres, the plywood joins were not lining up with my joists.  With the insulation and vapour barrier in place, moving the joists or adding an extra nailing surface was not an option.  I decided to call it a day and think about a solution.


 Tools packed up and tarp in place.  See you in two weeks!


Big thanks to my worker bees!  Such a great group to work with!

Thursday, 25 June 2015

Floor Plumbing

Dad came up to help me square the floor and attach the frame to the posts using Simpson Stong-Tie brackets.


Then we cut holes for the drainage pipes for the shower and sink.   I'm using 1-1/2" ABS pipe.  Knowing where the shower drain should be was a bit tricky without actually having the shower there; hopefully I put it in the right place!


 With all the precision work done, I'm ready to move on to finishing the floor.

Monday, 15 June 2015

Floor Framing

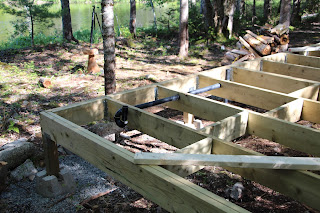
Had lots of help from my Meetup folks this weekend.  Got the foundation finished, the floor framed and leveled.  Just a few tweaks to get things perfectly square then I will attach the frame to the posts.

  Teamwork! Moving the cut lumber to the build site in the woods.

The floor frame is made of pressure treated 2x8... doubled up along the edges, and at one key point in the centre where the weight of the roof comes down.

 Attaching the joist hangers.  I decided on joist hangers instead of using beams, to keep the structure closer to the ground, and also to allow for rigid insulation to be attached below the frame.  Eliminating the beams and using just the frame on posts will reduce the amount of thermal bridging significantly.

 Finished frame.  So happy to see it starting to come together!

 Ivy, our mascot for the weekend.

 Rhododendrons in bloom.

Sunday, 14 June 2015

Flooring Plans

 Here are my plans for the floor.  Not sure if all that blocking will be necessary over such a short span.  I'll decide based on how straight the lumber is.


And here is my plan for the insulation and sheathing.  The whole exterior will be wrapped in 2" of EPS rigid insulation.  Under the floor I will attach a thin layer (3/8") of pressure treated plywood to keep out the critters.


The walls will be sheathed in plywood, covered in Tyvek, then 2" of rigid... following by strapping and finally the siding.

There are pros and cons to putting the Tyvek outside of the rigid, and also of putting the rigid before the plywood.  But in the end, it will all work as a system, and will breathe well since I've chosen EPS over XPS foam.

Thursday, 11 June 2015

Shou Sugi Ban


I've been considering Shou Sugi Ban for the exterior siding.  It's an ancient Japanese method of preserving wood, where you char it then oil it.  It makes it remarkably fire, bug and rot resistant, and only needs to be re-oiled every 10-15 years.


You can get different looks depending on how much you burn the wood, what wood you choose, and whether you choose to stain it or not.  I think I might play with different techniques to see a variety of colours to work with.


I like the way it brings out the grain.

And the contrast you can get with the different techniques

It's pretty labour intensive, but I think it will be fun.  And really, there's not that much siding to my tiny house.  :)  I think it will work well with my vision for the exterior.  All the finishes I'm drawn to seem to have these same tones: